Accidentally put your favorite wool sweater in the dryer? Don’t shed a tear—you may not be able to wear it anymore, but your living room will be better for it! I made this funky argyle pillow cover from one that used to fit the fiancé (oops).
Supplies:
•sweater
•pillow form that’s the same width as sweater
•straight pins
•sewing machine (a serger would be better, but if you sew over your seams twice you should be good to go!)
Step 1: Turn the sweater inside out. Lay flat and pin the sweater’s front and back together at the shoulders and neck.
Step 2: Break out the sewing machine and continue the existing side seams up to the top of the shoulders.
Step 3: Measure the height of your pillow form and mark that length from the bottom of the sweater. Sew straight across (perpendicular to your other seams) at the mark. Cut off extra material above the seam and on either side (the sleeves).
Step 4: Sew about 1/3 of the way in from each side along the bottom of the sweater.
Step 5: Turn the square inside out, stuff pillow form inside.
Step 6: Hand sew the remaining opening and viola! There’s a snappy new pillow in your home!
Stiksel, a.k.a. Karin Röling, was working as a graphic designer in the Netherlands when she decided to try freelancing. Fast forward two years and now she is the proprietor of a thriving etsy shop filled with creative pieces that showcase her design background.
Karin says, “When I make something, I don’t have a clear vision of how it should look like. I throw my table full of materials and start working and combining. Textures, colours, shapes. Things evolve by starting making them. I mostly get inspired by the material itself.”
I love the way she uses materials with a previous life in new and interesting ways — and of course I love the element of vintage typography!
Anna Alicia’s etsy shop is filled with fantastic clusters of felt flowers to adorn everything from your clothing to your home. Each bloom is made by cutting individual petals and sewing them together, then assembling the flowers into an elegant mass.
Of her work, Anna Alicia says, “I wanted to make something that could really change an outfit but that could also be worn in lots of different ways. I’m hugely inspired by Japanese craft, in particular Kanzashi flower hair accessories, and also by vintage fashion and jewelery.”
I love the delicate sculptural quality of the pieces, but by far my favorite aspect of her work are the fantastically unexpected color combinations she creates. “[They] are key to my designs, and I’m always intrigued to see which are most popular. My color inspiration comes from all over — painting, fashion, nature…” she says. Keep ’em coming — your pieces inspire me!
Ceramicist Jack Kalish has spent several years perfecting these adorable bookends. I love how realistic and soft they look, and the clever name he gave them — Bukushuns — or “Book Cushions.” Below he shares his inspiration, process and how they came about.
Bukushuns
I originally fell in love with ceramics during my senior year of college at Rochester Institute of Technology where I took an elective course in the subject. This is where the idea first came to me to create the Bukushins as my final project for the course. I was inspired by Wendell Castle, an artist-in-residence at my college, in his remarkable ability to render wood into seemingly soft blankets, sheets, and pillows as is seen in the incredible piece “Chair Standing on Its Head.” Not knowing what I was doing, I meticulously carved two pillows out of solid clay, and they shattered in the kiln!
It was not until after I moved to Williamsburg, Brooklyn in 2007 and discovered Choplet Studios that I again had my hand at ceramics. Having taken a course on mold-making there, I decided to try to make the Bukushins once more. This time, slip-cast. Again, I carved the pillow out of solid clay, and used it to make the mold. After casting, firing, and glazing the pillows, I fill them with sand to add weight, and seal them with plaster. I am constantly refining, tweaking, and improving the process.
I am interested in creating work that is both functional and artful. Though professionally, I mostly work with computers as an interactive designer and developer [check out Jack’s commercial work at www.kalicious.com], I really love working with my hands as well, and ceramics is my outlet for that. I currently produce my work at Choplet Studios in Williamsburg, Brooklyn.
Thanks very much, Jack! Bukushuns are available to purchase here.
 Simple and modern hand-painted pillow cover by The Shabby Chic Cottage.
 Creepy-cute stuffed crochet owls by Rosieplumpton! Love ’em.
 Sweet little birdie lariat necklace by hibiscusdays.
 Shabby chic wine stopper by bwsilver.
 Karin says, “When I make something, I don’t have a clear vision of how it should look like. I throw my table full of materials and start working and combining. Textures, colours, shapes. Things evolve by starting making them. I mostly get inspired by the material itself.”
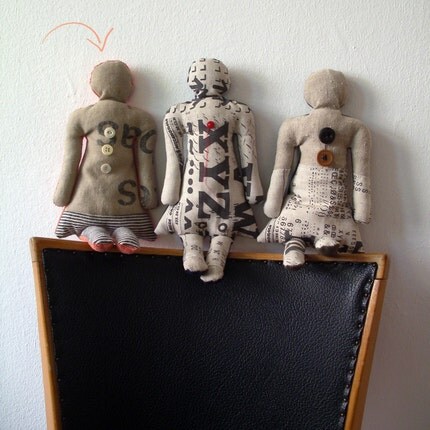 I love the way she uses materials with a previous life in new and interesting ways — and of course I love the element of vintage typography!

 I love the delicate sculptural quality of the pieces, but by far my favorite aspect of her work are the fantastically unexpected color combinations she creates. “[They] are key to my designs, and I’m always intrigued to see which are most popular. My color inspiration comes from all over — painting, fashion, nature…” she says. Keep ’em coming — your pieces inspire me!

 Thanks very much, Jack! Bukushuns are available to purchase