Hey you guys! It’s my birthday! So here’s a round up of all my in stock birthday cards… you should go buy them! Best gift ever :)


Hey you guys! It’s my birthday! So here’s a round up of all my in stock birthday cards… you should go buy them! Best gift ever :)
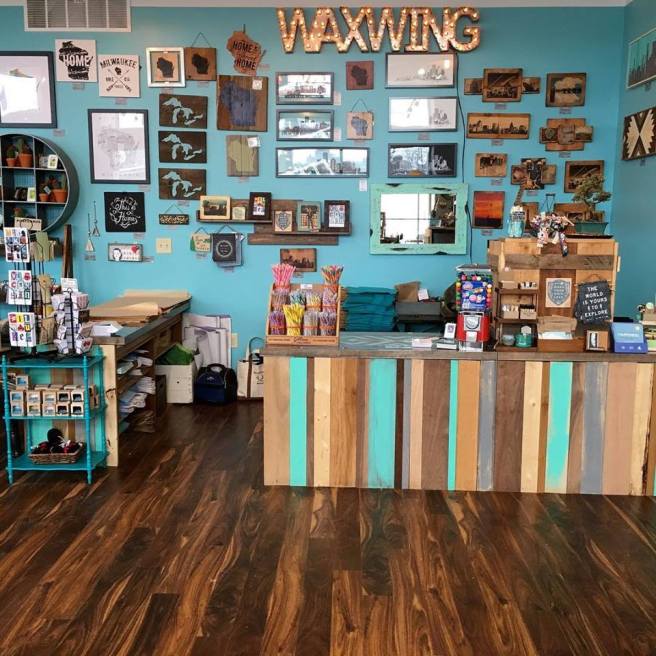
I’m super excited to announce 622 Press goods are now available at The Waxwing in Milwaukee! I’ve been wanting to get into MKE for years now, but hadn’t found the right fit—until now! The Waxwing is just my style: an eclectic mix of local and international artists and makers curated into a one-stop shop for any occasion, including when you just need to treat yourself!

Owner Steph carries art and paper goods as well as clothing, housewares and more! She’s carrying my wood type “hello” cards in exclusive colors, along with a few of my favorite designs for any occasion! Stop by E. North Avenue to see them all!
I’ve been friend with Nicole, who I recently visited in Houston, since she moved to Wisconsin in fifth grade. She’s one of the funniest, weirdest (in a good way!) people I know, and also happens to love the embroidery hoops I can’t seem to stop making. So when she started shouting out funny and often inappropriate phrases followed by “Put that in a hoop!” I started taking notes.
 The first hoop I worked on was actually my idea—one of my favorite sayings actually! A lot of these hoops will be set in my favorite gorgeous calligraphy typeface, I just love the contrast of the cheeky message with the elegant typography—especially in such a traditional medium. It’s been super popular on Instagram, so get it here while you can!

These little orange numbers are all Nicole. I even sent the “lolz” design her way as a birthday present last week (hopefully it has arrived and I didn’t just ruin the surprise!), but if you want your own (in custom colors!), just get in touch.
 I’ve also made a few non-vulgar hoops, but where’s the fun in that? Anyway, this dreamcatcher one is my favorite. Get it here.
Well folks, now I have some sad news. I’m out of hoops. I went to the local fabric store to pick up some more, and oddly enough, all sizes were about the same price. But that means the smaller sizes cost about 5 times what they cost in the states, so I just can’t swing it. I’m exploring other ways to frame these up (which may end up being cheaper to ship too! YAY!), but in the mean time, I’ll still be stitching away! Here’s a design that doesn’t have a home yet:

Now go away ;)
I mentioned my upcoming Alice in Wonderland styled photo shoot in my last post, but I realized I didn’t give you very many sneak peeks! So this post is where I spill all the beans.
The first rose I tackled was actually the giant number above. The planner for the shoot envisioned the bridesmaids with two huge individual white roses instead of a bouquet. They were time consuming and between two of them used up an entire roll of crepe paper, but super fun to make and turned out beautifully! I’m so excited to see them worked into the shoot. (Photo by Adrian Cunningham)

The bride’s peony and rose bouquet is a little more my style, but I also put quite a few Alice-esque twists on it. Lots of red and white roses—of course—and I also worked in a few “leaves” made from playing cards, with the Queen of Hearts featuring prominently. This photo is just a quick phone snap—can’t wait to see what the professional photographer does with these!
Want to inquire about wedding services or your own everlasting bouquet? Get in touch!

I’ve figured out how to make lots of crepe paper flowers—peonies, poppies, daisies, tulips, crocuses and lots more—but I’ve put off classic roses. They’ve never been one of my favorite flowers because they seem to be a sort of default buy (When in doubt, go with a dozen red roses, right?), they seem almost ordinary in my mind. That was, until, last weekend.
I was recently asked to contribute to an Alice in Wonderland themed styled shoot, so it was time to finally tackle the rose! It took me a few tries, but once I got it, I REALLY got it. And now I’m in love with roses!

The spiraling center, radiating delicate curled petals… I just love everything about them. Of course my favorites are the unexpected colors though! These yellow beauties are my favorites, but orange is next on the docket, so that may change. You can order yours here!

 Once I had the basics mastered, I started experimenting with mixing petal colors, and even made one very special hand-painted rosebud for the Alice shoot (remember that about a hundred rose photos ago?).
When I was finished with my rose production extravaganza, I asked my photographer friend Adi to come over and snap a few pics. He took the shot of the white bouquet at the very top of my post as well as this one below! Check out more of his work on his newly launched website!
